April 3, 2024
Spring Cleaning: The Essential Starting Point You Need
April 16, 2021
9 Easy DIY Maintenance Projects for Your Home
There’s no way around it: homeownership can be hard work. Long gone are the days when you can call up the landlord to fix a clogged toilet or a broken sprinkler. Once you buy your own home, it’s your responsibility to make sure everything is running smoothly. There are two options when it comes to everyday maintenance: either you shell out the money to hire a professional, or you do it yourself.
Many homeowners choose the DIY option. Not only can you save a buck, but you also get the satisfaction of tackling basic home maintenance without depending on others. While some things are best left to the pros (major electrical and plumbing issues), others are easily achievable by anyone with a basic understanding of home repair and a toolbox. Following are common DIY maintenance projects for your home.
Caulk a Tub

It’s one thing to scrub away the mold and mildew that builds up in the bathtub or shower. But preventing that moisture from getting behind the tile and causing unseen damage to the wall is a crucial part of home maintenance. Replacing worn or stained caulk in a tub, shower or sink is an easy DIY project. First, remove the existing caulk with a utility blade or a special caulk scraper. Then, clean and dry the surface, apply painter’s tape, pipe the caulk in, and smooth with a caulk knife or your finger dipped in water. Curing times vary from product to product, but the general rule of thumb is to wait at least 24 hours before exposing the new caulk to moisture.
Clean the Gutters
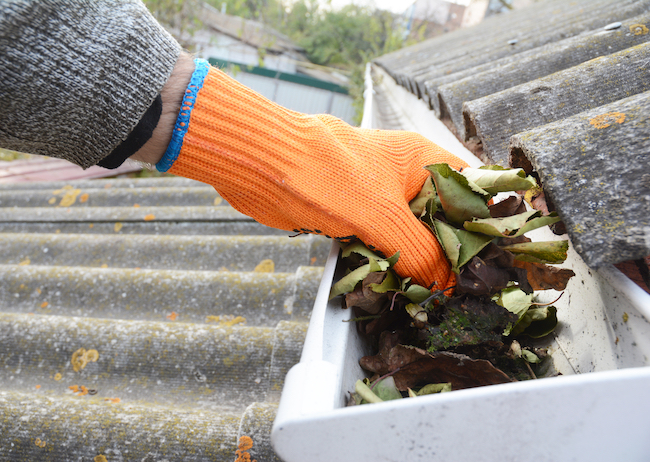
Cleaning gutters is a rite of passage for most homeowners. It can be a messy job, but one that’s worth doing to prevent water damage come winter. Removing the buildup of leaves and other debris can also prevent vermin from nesting in your gutters. You’ll have to climb a ladder for this one, and using your hands (or a scoop made for just this purpose), clean out all the icky accumulation. It’s recommended to clean gutters twice a year — in the spring and fall.
Replace Roof Tiles

Cleaning your gutters is the perfect opportunity to tackle another overhead project — inspecting your roof! One broken or missing roof tile or shingle can mean thousands of dollars in water damage, so it’s important to inspect your roof at least twice a year. If there are any missing or damaged tiles, use a brick trowel to lift the surrounding overlapping tiles, then secure with a shim. Then use the trowel to lift the broken piece down and out. Replace with the new tile, following the same steps in reverse. Another method is to break the tile into smaller pieces before removing it. For shingles, use a pry bar to release the shingle above the broken one, and remove the roof nails. Slide the new shingle into place, aligning it with the shingles on either side before securing.
Quiet a Running Toilet

No need to call a plumber to fix an annoying running toilet. There are several causes for running toilets. One is due to a worn-out flapper that fails to seal, thus allowing water to dribble into the bowl. First, turn off the water at the shutoff valve. Then, detach the old flapper and remove the chain. Attach the new flapper to the flush valve and reattach the chain to the flush handle, adjusting the chain length to ensure a seal without excessive slack. Another cause is a malfunctioning float, which prevents the valve from closing. Check to make sure the float isn’t stuck or worn out and replace if necessary, or adjust the float arm to ensure the proper water level in the tank.
Clean the Dryer Hose

Did you know dryer lint buildup is the leading cause of dryer fires in the United States? Cleaning the lint trap after every cycle is imperative, as is cleaning lint accumulation in the hose and vent pipe. To do this, disconnect the dryer and remove the dryer duct from the clamps on the back of the unit. Vacuum out the vent pipe and hose, then follow-up with a long-handled vent brush. Depending on your layout, you can also use a leaf blower to blow out the vent. Repeat the process from the exhaust end of the hose on the outside of the house.
Fix a Leaky Faucet

Not only can the drip-drip-drop of a leaky faucet keep you up at night, but it can also cost you. It is estimated that just one leaky faucet can cost as much as $20 a month in wasted water! Luckily, fixing a leaky faucet is an easy DIY project. To begin, turn off the water and remove the faucet handle. Then, replace the rubber washer with a new one and tighten the nut. If any of the components are rusted or disintegrated, consider replacing the faucet itself.
Replace an Air Filter
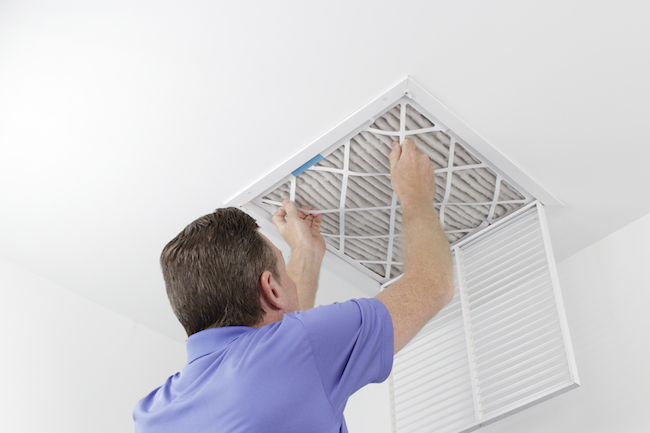
Replacing your air filter regularly is one of the best ways to ensure your HVAC system runs efficiently. It can extend the life of your furnace, reduce energy costs and improve indoor air quality. On average, your air filter should be changed every three months, but if you have pets or allergies they should be changed more often. To change the filter, turn off your system. Then, remove the grills to the intake unit — this may require the use of a screwdriver. Remove the old filter and insert the new one with the arrows facing into the unit. Replace the grill and turn your system back on. It’s also a good idea to vacuum the grill cover itself.
Unclog a Drain

When it comes to clogged drains, an ounce of prevention is worth a pound of cure. Using hair traps and strainers is the best way to catch anything other than water from sliding into the drain, but all too often, things sneak by, leaving you with a clogged drain. For most clogs, you can skip the pricey plumber or the dangerous chemicals and instead use an inexpensive barbed drain snake to capture the clog or push the clog through with a plunger. Another trick, especially with clogged toilets, is to use dish soap; the soap coats the clog and allows it to slip on through.
Fix a Sprinkler Head

Whether due to careless mowing or an errant soccer ball, sprinkler heads often get broken. But you don’t have to call a landscaper to fix them, as they are an easy DIY repair. The first step is to scoop out the dirt surrounding the sprinkler head, then unscrew the old sprinkler head from the riser and replace it with the new one. If the riser itself is broken or damaged, replace it with one of the same height, using seal tape around the threads. Turn on the water and adjust the spray to ensure it is aimed in the right direction. Replace the dirt and reseed the area if necessary.
Category Home Inspiration
Elizabeth Penney
Elizabeth Penney is a content writer for Lyon Real Estate and the Lyon Local blog. A Sacramento native with a marketing background, she shares her insider knowledge on restaurants, attractions and outdoor activities throughout the greater Sacramento area and beyond.